決定木回帰
決定木による回帰モデルの作成を行う。
まず、anscombeデータセットを用いて、簡単なものから始める。
import seaborn as sns
anscombe = sns.load_dataset('anscombe')
dataset1 = anscombe[anscombe['dataset'] == 'I']

print(dataset1)
決定木回帰は、scikit-learnにおいてはDecisionTreeRegressorを用いる。
max_depthによって、決定木の最大の階層数を指定する。
from sklearn.tree import DecisionTreeRegressor

x = dataset1['x'].values # numpy.ndarrayに変換
x = x.reshape(-1, 1) # 2次元データに変換、-1はデータに沿って値を決めることを示す
y = dataset1['y'].values
y = y.reshape(-1, 1)

# 決定木回帰
model = DecisionTreeRegressor(
    max_depth=3
)
model.fit(x, y)
決定係数での評価を行う。
model.score(x, y)
max_depthが3の場合、0.857となった。
0.8574331710130728
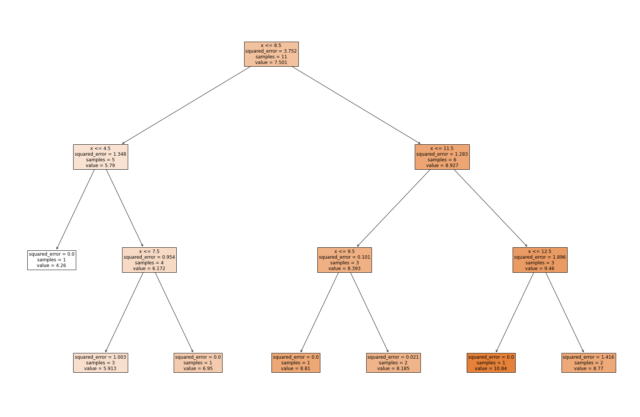
作成された決定木を描画し、どのような判断で結論が得られたかを可視化する。
from sklearn.tree import plot_tree
from matplotlib import pyplot as plt
%matplotlib inline

plt.figure(figsize=(30, 20))
plot_tree(
    model,
    label='all', # all, none
    max_depth=3,
    filled=True,
    feature_names=['x'],
    fontsize=12,
)
plt.show()
3層目において、squared_error(二乗誤差)が0.0になっていない葉(Leaf)が存在する。さらに階層を深めれば予測精度が高まる可能性がある。
max_depthを4に設定する。
model2 = DecisionTreeRegressor(
    max_depth=4
)
model2.fit(x, y)
model2.score(x, y)
決定係数が0.97と向上した。
0.9705180356987099
さらに、max_depthを5に設定する。
model3 = DecisionTreeRegressor(
    max_depth=5
)
model3.fit(x, y)
model3.score(x, y)
ここで決定係数が1.0となった。与えたトレーニングデータにおいては完全な予測が可能になった。(ここではテストデータによる評価を行っていないので、過学習の可能性も念頭に置いておく必要がある。)
1.0

